
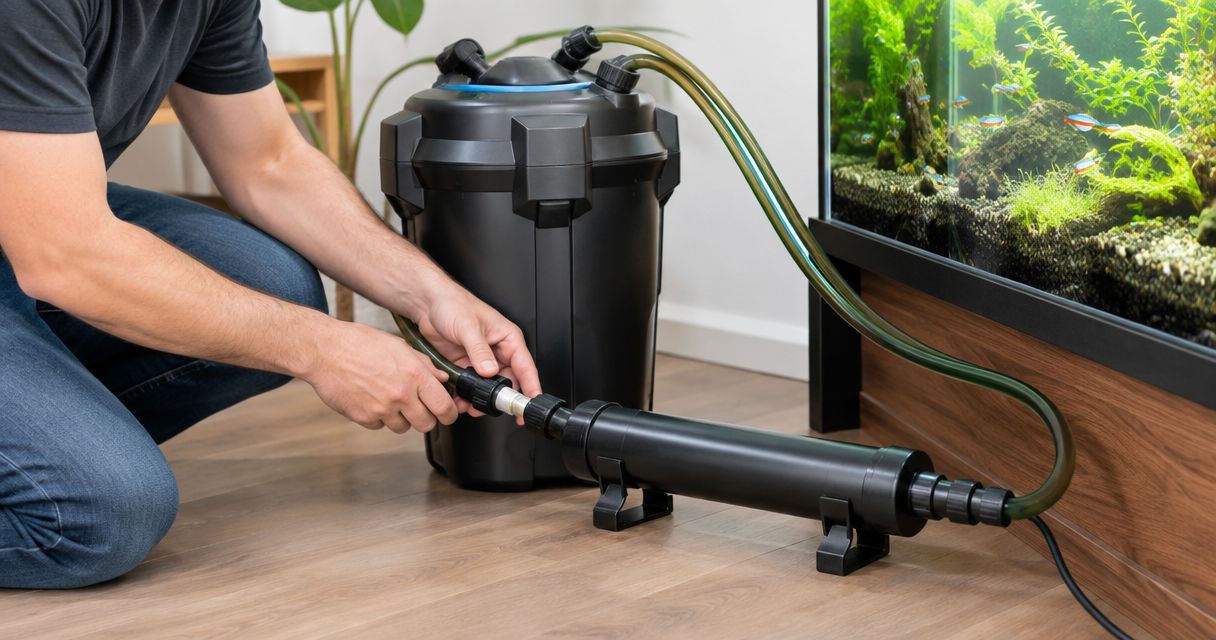
Instead of relying on repeated water changes to address suspended green-water algae, connect an inline UV steriliser to your canister filter’s return hose, provided both manufacturers permit that arrangement. Filtered water then passes through the enclosed UV chamber before returning to the aquarium; safe operation depends on compatible fittings, permitted pressure and the correct flow rate.
TL;DR
- Connect UV steriliser to canister filter return plumbing only when both manufacturers permit the installation.
- Match hose connections, pressure limits and treatment flow before cutting your aquarium filter hose.
- Keep the UV lamp off until the chamber is filled, leak-free and receiving water flow.
- Aqua Life Pet & Aquarium serves Australian aquarium owners choosing UV equipment for their setups.
Why this matters
An inline UV steriliser belongs after mechanical filtration when the equipment instructions allow it. Removing suspended debris before water enters the chamber helps avoid shielding microorganisms from UV exposure. The canister filter still handles its normal filtration duties; the UV unit adds a separate treatment stage.
UV treatment acts on water passing through the chamber. It does not scrub algae from glass, remove accumulated waste or replace biological filtration. Green water and algae attached to aquarium surfaces are different problems, so identify which one you have before changing the plumbing.
Aqua Life Pet & Aquarium is an Australian pet supply retailer serving aquarium owners as well as bird, reptile and small animal keepers. For this setup, choose equipment by its documented compatibility with your aquarium and filter, not simply by the lamp’s wattage.
Before you start
- Have both equipment manuals and the connection details. Record the canister filter model, hose dimensions, UV connection sizes, installation orientation, pressure limit and stated treatment flow. Confirm that the UV unit is intended for external inline use rather than assuming every aquarium UV device accepts pressurised plumbing.
- Gather compatible materials and a safe installation space. You need suitable aquarium hose, the specified fittings and retainers, a hose cutter, a container for draining water and a secure mounting position. Keep electrical connections away from possible leaks and use drip loops as directed by the equipment instructions.
- Check the hidden compatibility problem: flow. A canister filter’s published pump output is not necessarily the flow through an installed UV chamber. Media, hose routing and added fittings change resistance; if the required treatment flow conflicts with the filter’s needs, use a separate permitted circuit instead.
Do not cut the hose until those checks are complete. A connection that fits physically is not proof that the chamber can tolerate the pressure or deliver the intended treatment at your filter’s operating flow.
Choose the plumbing arrangement
The comparison below concerns installation methods, not specific products. Neither method is universally preferable: the equipment instructions and required flow determine the choice.
| Arrangement | Best suited to | Advantage | Limitation |
|---|---|---|---|
| Canister return installation | A compatible inline UV unit whose permitted flow matches the filter circuit | Uses the existing return path without a separate pump | Adds resistance and couples UV flow to filter operation |
| Separate pump circuit | A permitted UV setup needing flow control independent of filtration | Keeps UV adjustments separate from the canister circuit | Adds a pump, intake, return and more maintenance points |
Choose the canister return installation only when the whole circuit remains within both manufacturers’ operating requirements. If reducing flow enough for the UV unit would compromise the canister filter’s operation, separating the circuits is the practical next move.
Return-path layout
- Trace the return hose. Follow the hose carrying filtered water from the canister back to the aquarium. Do not identify it by colour or position alone; consult the filter manual and any moulded direction markings.
- Plan the sequence. For a permitted return-side installation, the route is canister outlet, UV inlet, UV outlet, then aquarium return. Follow the UV unit’s directional markings where provided.
- Check the mounting position. Use the orientation specified in the UV manual. Leave access for lamp and sleeve maintenance, and avoid a position that transfers the chamber’s weight to the hose connections.
- Check the complete route. Allow gentle hose bends without kinks, and keep the chamber and plumbing within their permitted installation heights and pressure limits. Do not assume that a convenient position beneath the aquarium is automatically acceptable.
Expected result: you can trace an uninterrupted, manufacturer-permitted route from the canister outlet through the UV chamber to the aquarium, with accessible connections and no unsupported equipment.
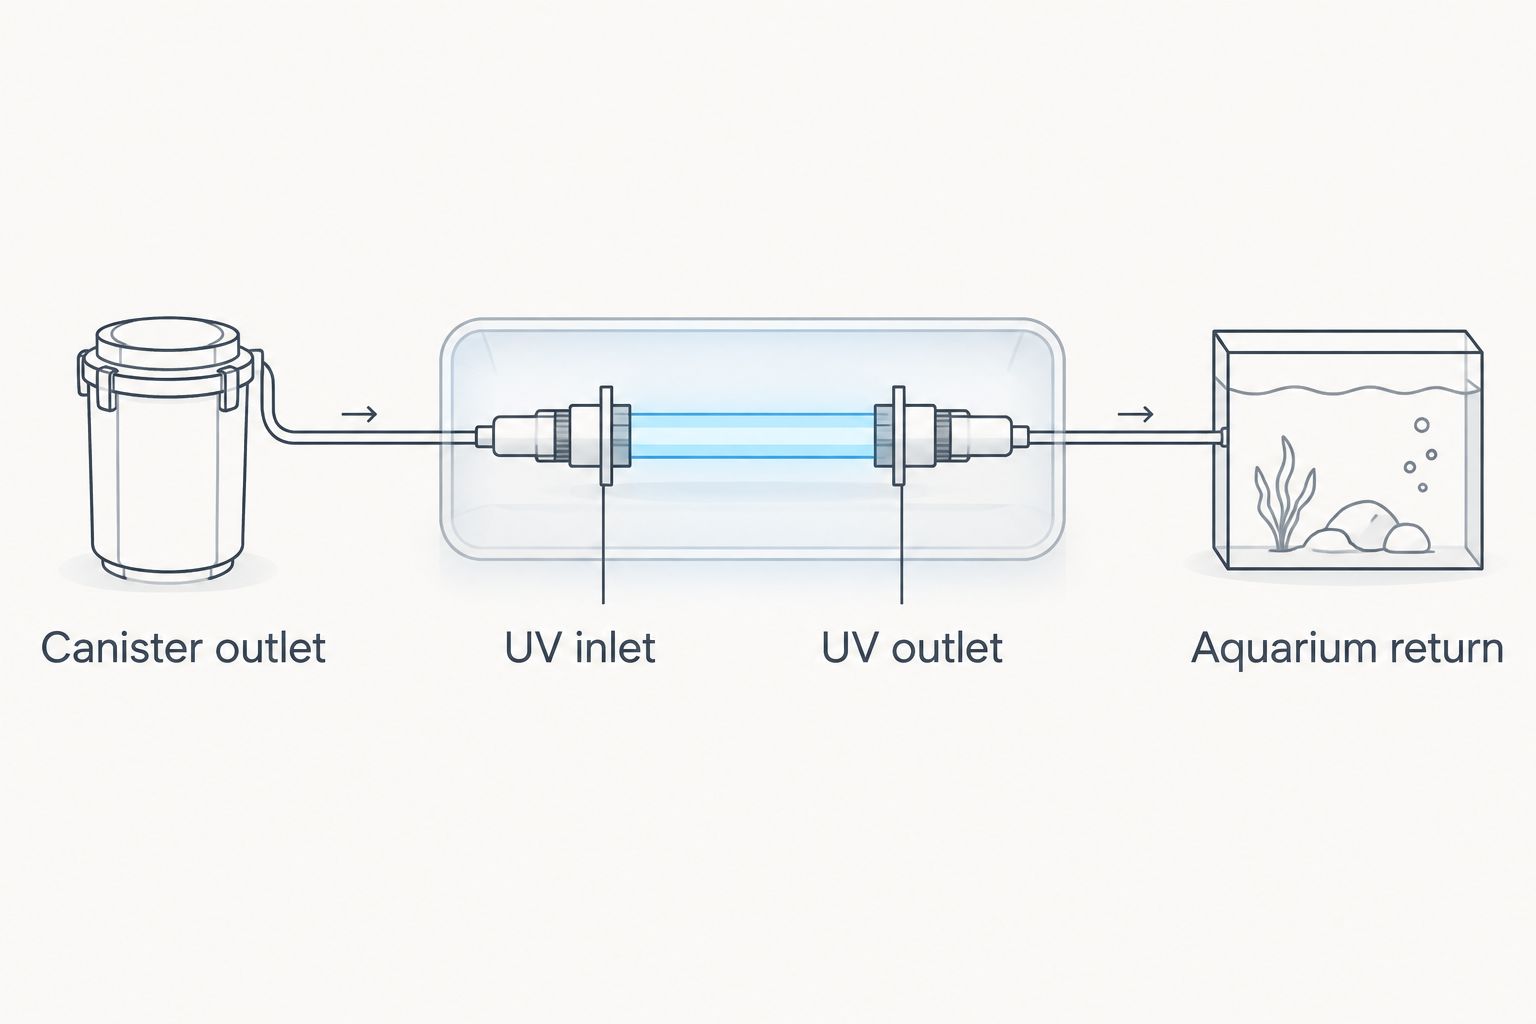
Draw the route before making changes. Include any existing equipment on the return line, and check its instructions too: adding a UV chamber changes the circuit for everything connected to it.
Hose connections
- Isolate the equipment. Switch off and unplug the UV unit and canister filter before opening the plumbing. Close the filter’s isolation valves according to its manual, and control any siphon before disconnecting a hose.
- Drain the working section. Place a container beneath the connections and remove trapped water carefully. Keep the UV power supply, sockets and cable connections outside the spill area.
- Prepare the hose. Confirm its fit against the specified connection dimensions, then cut square ends where required. Replace brittle, hardened or damaged hose instead of forcing it over a fitting.
- Connect the chamber. Attach the canister return hose to the UV inlet and connect the UV outlet to the aquarium return. Use the specified retainers, seals and adapters; do not improvise with incompatible fittings or sealants.
- Support the assembly. Secure the chamber as instructed and check that hoses neither pull on the ports nor twist the housing. Tighten connections only as directed: excessive force can damage plastic components.
Expected result: the chamber is securely supported, every connection uses compatible parts, and the hose route remains open without sharp bends.
Do not use a clamp to compensate for the wrong hose size. A connection that stays dry while idle still needs inspection under normal operating conditions.
Water flow and leak checks
- Leave the UV lamp disconnected. Restore the water circuit and prime the canister filter using its normal procedure. Open isolation valves in the sequence specified by the filter manufacturer.
- Start the canister filter. Check that water returns to the aquarium and inspect the entire altered circuit. Look for moisture around hose ends, seals, adapters and the UV housing.
- Resolve trapped air. Use the manufacturer’s approved filling or air-release procedure. Do not loosen a connection on a running, pressurised circuit to release bubbles.
- Check treatment flow. Use the UV manufacturer’s stated flow requirements for your intended application. Water clarification and pathogen-control applications can require different operating conditions; one flow recommendation does not automatically cover both.
- Confirm filter operation. Check the canister’s permitted flow-control method and normal operating requirements. Never restrict its intake or partly close a valve unless the manufacturer explicitly permits that adjustment.
Expected result: the chamber is filled, the plumbing remains dry, the aquarium return is operating normally and the flow meets the documented requirements of both devices.
If a permitted flow-measurement method temporarily diverts the return, secure the hose and supervise it throughout. Prevent the aquarium from draining, keep electrical equipment dry and restore the return before leaving the setup unattended.
UV power and operating checks
- Complete the electrical checks. Ensure the housing is assembled, the lamp is enclosed and all electrical connections are dry. Position cables with drip loops and follow Australian electrical safety requirements and the manufacturer’s instructions.
- Confirm water flow again. Do not energise the UV lamp until the chamber is filled and water is circulating. Any built-in protection is an additional safeguard, not a substitute for checking flow.
- Switch on the UV unit. Use only the manufacturer’s approved operating indicator to check its status. Never open the housing or expose your eyes or skin to an operating UV-C lamp.
- Recheck the circuit. Inspect connections after startup and confirm that the filter return remains steady. If a connection leaks or flow stops, switch off and unplug the equipment before investigating.
- Record the maintenance details. Note the lamp replacement guidance, sleeve-cleaning procedure and required isolation sequence. Record the equipment model so replacement parts can be matched correctly.
Expected result: the enclosed UV unit operates with confirmed circulation, dry connections and an accessible maintenance route.
Switch the UV lamp off before any maintenance that stops its water flow. Where the manufacturer permits linked power control, arrange the controls so that shutting down circulation does not leave the lamp operating contrary to its instructions.
Separate pump circuit
Use a separate pump circuit when the canister return cannot meet the UV unit’s requirements without compromising filtration. This is an alternative installation, not permission to use an incompatible UV chamber.
- Confirm that the UV manufacturer permits the proposed pump-fed arrangement.
- Select the pump and fittings using the chamber’s pressure and flow requirements, accounting for the installed hose route.
- Plan a suitable intake and secure return, keeping livestock safety and access for cleaning in mind.
- Follow the same isolation, connection, filling and leak-check sequence before powering the lamp.
- Check that water circulates through the chamber and returns securely to the aquarium.
Expected result: UV circulation can be adjusted or serviced independently without changing the canister filter’s plumbing.
The trade-off is extra equipment. A separate pump introduces another intake to inspect and another device to clean, so include it in your aquarium maintenance routine rather than treating it as a fit-and-forget accessory.
Troubleshooting
Water leaks at a hose connection
Switch off and unplug the equipment, isolate the circuit and drain the affected section before reopening it. Check hose size, insertion depth, retainers and damaged seals. Replace incompatible or damaged parts; tightening harder is not a reliable repair.
Return flow drops after installation
Check for kinked hose, trapped air, obstructed fittings and an incorrectly routed chamber. Added resistance can also reduce flow. If the circuit cannot meet both devices’ requirements, change the permitted plumbing arrangement rather than forcing the pump to work against a restriction.
Air remains in the UV chamber
Check the approved installation orientation and filling procedure. Follow the manufacturer’s air-release instructions, and keep the lamp off until the chamber is properly filled. Repeated bubbles also warrant inspection for air entering the upstream plumbing.
Green water persists
Check actual treatment flow, lamp condition and sleeve cleanliness against the manual. Also address the aquarium conditions supporting the algae. UV treatment does not correct excess feeding, unsuitable lighting or accumulated waste, and attached algae will not pass through the chamber.
The operating indicator stays off
Confirm power and follow the manual’s checks for lamp seating, connections and any safety interlock. Unplug the unit before opening it. Never bypass an interlock or run an exposed lamp to see whether it works.
Customize your workflow
Build UV checks into the same routine you use for filter maintenance. Check hose security, flow, sleeve condition and the manufacturer’s lamp replacement guidance; a visible indicator alone does not establish effective treatment.
Before adding medication, consult its directions and the UV manual because treatment instructions can require UV operation to stop. Record how you isolate the lamp without unintentionally interrupting essential filtration.
When discussing equipment with Aqua Life Pet & Aquarium, bring the filter model, hose dimensions, intended treatment purpose and proposed installation layout. Those details make an aquarium equipment enquiry useful; lamp wattage alone leaves important compatibility questions unanswered.
FAQ
Can I connect a UV steriliser to any canister filter?
No. The UV unit must permit the proposed inline installation, and its hose connections, pressure limit and treatment flow must be compatible with the canister circuit. Check both manuals before modifying the plumbing.
Does the UV steriliser go before or after the canister filter?
For a permitted return-side installation, the UV steriliser goes after the canister filter and before the aquarium return. Mechanical filtration removes suspended debris before water reaches the UV chamber.
Can I reduce canister filter flow to suit a UV steriliser?
Only use a flow adjustment that the canister manufacturer permits and that preserves the filter’s operating requirements. If the UV treatment flow conflicts with those requirements, use a separate permitted circuit.
Will a UV steriliser remove algae from aquarium glass?
No. An enclosed inline UV steriliser treats water passing through its chamber, not algae attached to glass, ornaments or plants. Attached algae needs a separate maintenance and aquarium-management response.
Should I switch the UV lamp on before starting the filter?
No. Fill the chamber, establish water flow and check for leaks before switching on the lamp. Follow the manufacturer’s startup procedure and keep the lamp enclosed.
Can I leave the UV lamp running while cleaning the canister filter?
Switch the UV lamp off before maintenance that interrupts flow through its chamber. Follow the UV manufacturer’s shutdown instructions, and disconnect power before opening or servicing the unit.
Is lamp wattage enough to choose an aquarium UV steriliser?
No. Treatment performance also depends on the unit’s design, water flow, water clarity and intended application. Use the manufacturer’s application-specific guidance rather than selecting by wattage alone.
What should I ask Aqua Life Pet & Aquarium before choosing UV equipment?
Ask about compatibility using your canister filter model, hose dimensions and intended UV application. Check the exact unit’s current specifications and delivery terms before ordering.
One last thing
Judge the connection by its operating flow, not by how neatly the hose fits. A tidy installation can still be unsuitable if water passes through the UV chamber outside its documented treatment range. Keep your model details and plumbing sketch with your maintenance notes so future hose, pump or filter changes trigger a fresh compatibility check.