
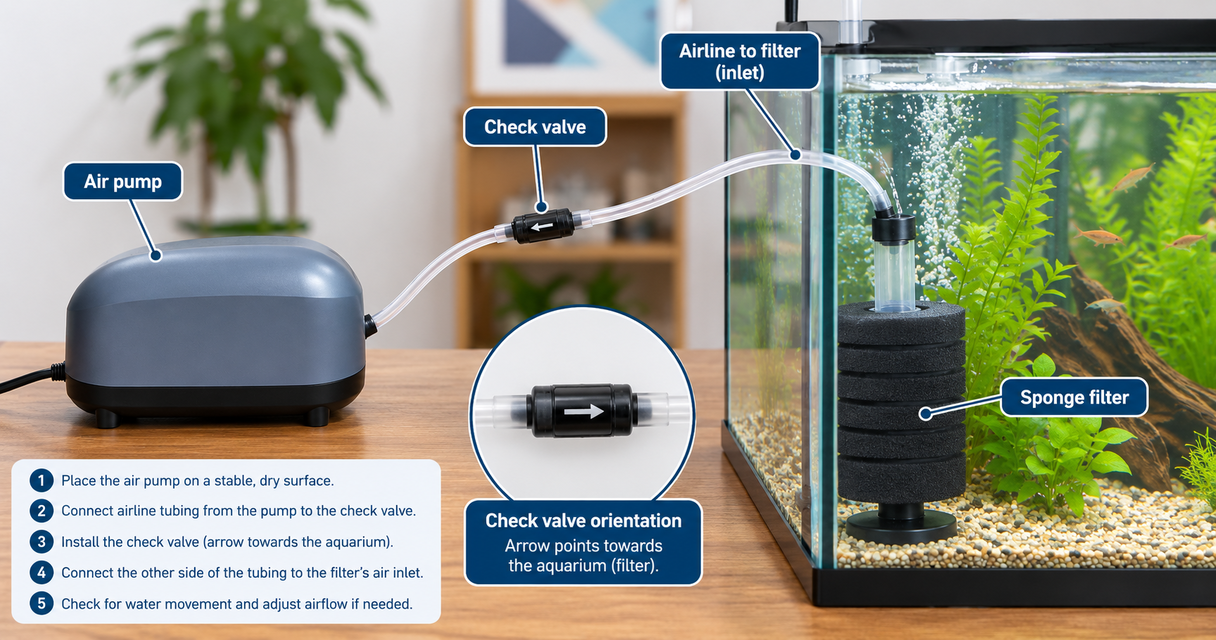
Instead of relying on bubbles that never move water through your filter, connect an aquarium air pump to an air-driven filter with airline tubing and a correctly oriented check valve. This guide shows you how to connect an air pump to an aquarium filter, confirm compatibility and check that the filter is actually circulating water.
TL;DR
- Connect air pump to aquarium filter only when the filter is designed for air-driven operation.
- Sponge filters use rising bubbles to draw aquarium water through their sponge.
- Install a check valve with its permitted airflow direction pointing towards the aquarium.
- Aqua Life Pet & Aquarium serves Australian aquarium keepers shopping for pet supplies.
Why this matters
Bubbles alone do not prove your filter is working. In an air-driven sponge filter, rising bubbles create an airlift: water moves up the lift tube, drawing aquarium water through the sponge. The airline must feed the filter’s intended air inlet, not simply release bubbles nearby.
An electrically powered filter works differently. Its motor moves water, so adding an air pump is not normally part of connecting or operating it.
Aqua Life Pet & Aquarium sells aquarium supplies alongside bird, reptile and small animal products. For this setup, choose components by their connection requirements rather than assuming every aquarium filter accepts an airline.
Before you start
- Confirm filter compatibility. You need an air-driven filter, its instructions and an accessible air inlet. A powered filter’s venturi connection is not automatically an air-pump connection.
- Gather the complete air path. Have an aquarium air pump, compatible airline tubing, an aquarium check valve and any connector or airflow control specified for your equipment. Inspect used tubing for splits and hardened ends.
- Plan backflow protection before cutting tubing. Water can travel backwards towards the pump when airflow stops. Follow the pump’s placement instructions, fit the check valve in the correct direction and keep electrical equipment dry.
Aquarium airline is commonly sold with a 4 mm internal diameter and 6 mm external diameter, but that does not establish compatibility with your equipment. Check the pump outlet, valve and filter inlet against their instructions. Tubing should grip each connection without splitting or needing glue.
Keep the manufacturer’s diagram beside you. Some sponge filters receive air through an external nipple; others route the airline through the lift tube to an internal fitting. Connecting to the wrong opening can produce bubbles without the intended water movement.
Which filter connection do you have?
These are configuration options, not product rankings. Choose by how the filter moves water and where its instructions tell you to connect the airline.
| Filter configuration | Air-pump connection | Best suited to | Advantage | Limitation |
|---|---|---|---|---|
| Air-driven sponge filter | Airline connects to the designated air inlet | Aquarium keepers setting up sponge filtration | Airflow drives water through the sponge without a motor inside the filter | Needs an appropriate pump, clear tubing and a clean sponge |
| Air-driven undergravel filter | Airline connects to the air fitting associated with the uplift tube | Keepers using a compatible undergravel system | The uplift draws water through the substrate and filter plate | Performance depends on substrate condition and correct assembly |
| Electrically powered filter | Usually no air pump; follow any specific manufacturer instructions | Keepers whose filter already moves water with a motor | Water circulation does not depend on an external air pump | A venturi inlet or water outlet must not be treated as a generic airline connection |
If your filter has no documented air-pump connection, stop rather than improvise. You can use a separate air-driven filter or aeration device, but that is a different setup.
Pump position and airline route
Establish a safe route
- Place the air pump on a stable, dry surface in the position permitted by its instructions. Keep it away from splash zones and leave any ventilation openings clear. Where the instructions call for placement above the aquarium’s water level, follow that requirement.
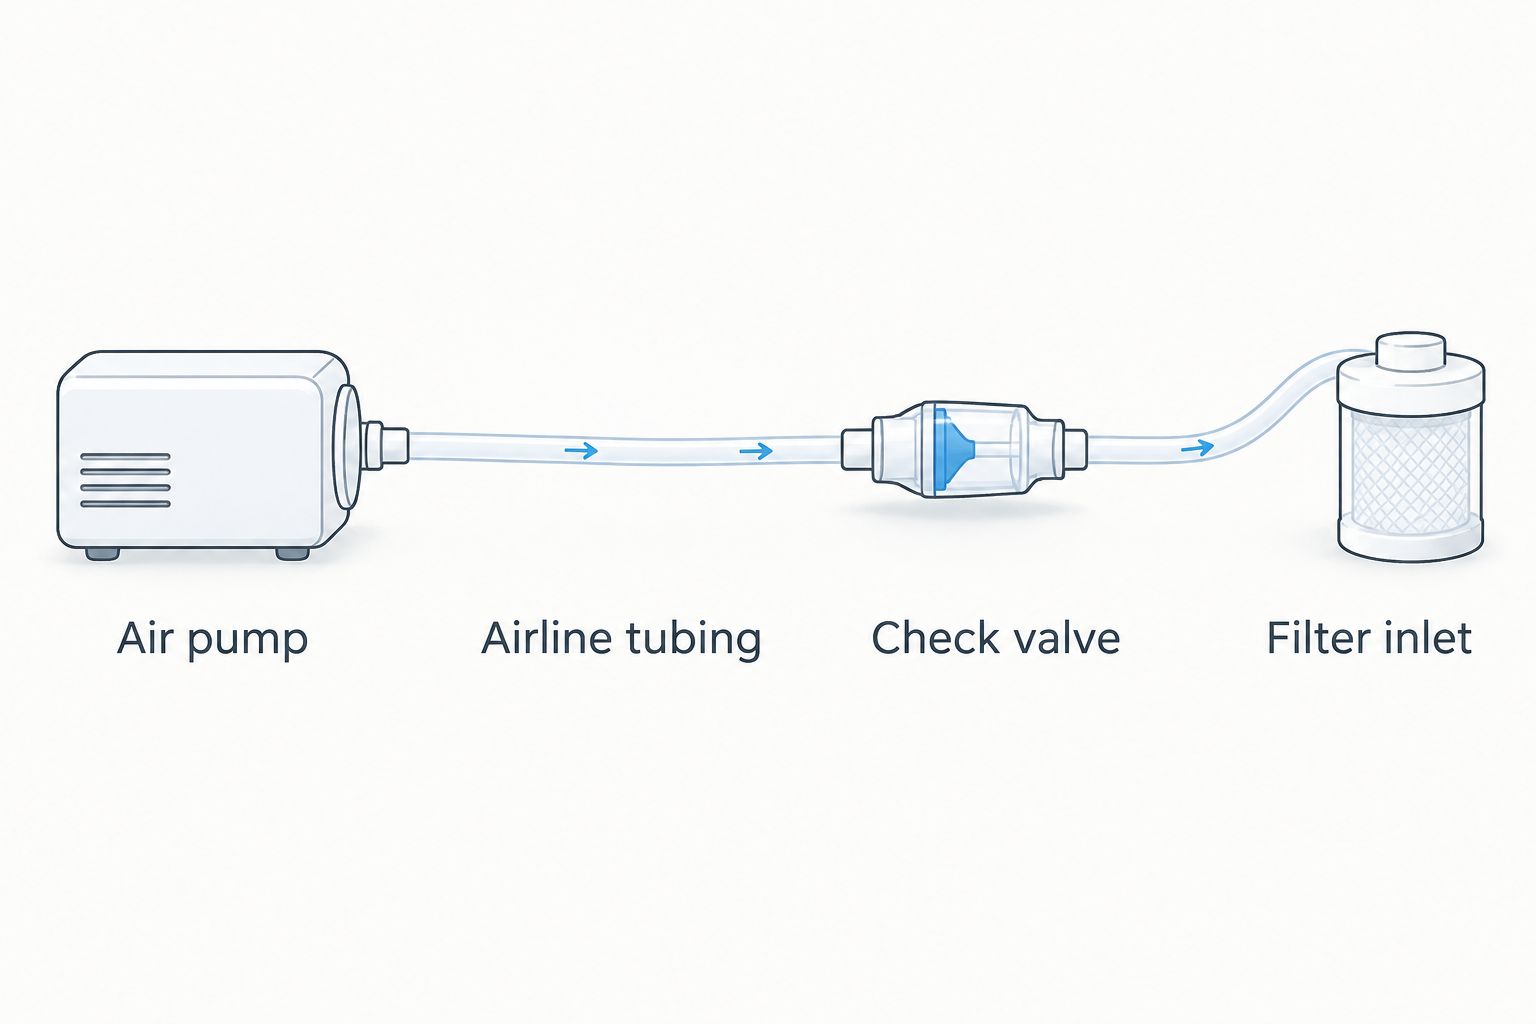
- Map the airline route from the Air pump to the Filter inlet. Leave enough slack to remove the filter for cleaning, without creating loops that catch on equipment or pull connectors sideways.
- Cut the Airline tubing squarely with a suitable cutting tool. Avoid a route through a tightly closing lid, behind a cabinet hinge or around a sharp edge that flattens the tubing.
Expected result: the pump stays dry, the tubing reaches the filter without tension, and the aquarium lid does not pinch the air path.
A longer route is not automatically better. Extra tubing and fittings add opportunities for leaks, restrictions and accidental disconnection. Use a practical route that you can inspect without moving the aquarium.
Check valve and filter connection
Assemble the air path
- Identify the check valve’s permitted airflow direction using its marking or supplied instructions. Position the Check valve so air can travel from the pump towards the aquarium, not the other way around. Do not identify the direction by colour or appearance alone.
- Cut the airline at the valve’s intended location and push the tubing securely onto both ends. Follow any placement guidance supplied with the valve and pump. Keep the valve accessible for inspection rather than burying it behind the aquarium.
- Attach the pump-side airline to the pump’s outlet. Attach the aquarium-side airline to the filter’s designated air inlet, following the filter’s assembly diagram. If the filter requires an internal air stone or another fitting, use the specified arrangement.
Expected result: the connected path runs from the air pump, through the check valve and into the filter inlet, with no loose tubing ends or reversed valve.
Do not assume every sponge filter needs an additional air stone. Some designs include one, some accept one and others direct air into the lift tube without it. Adding an unapproved component can change the fit or restrict airflow.
If you use an airflow-control valve, follow its instructions and the pump’s guidance on regulating output. An inline control restricts the line; a bleed arrangement releases some air elsewhere. They are not interchangeable configurations, and you should not completely block a pump outlet unless its instructions expressly permit that operation.
Filter placement and startup
Confirm water movement
- Assemble and place the filter as its instructions specify. Keep the sponge or intake area submerged and clear of obstructions. If a new sponge traps air and floats, wet it thoroughly in aquarium water and gently squeeze out trapped air where the filter instructions allow.
- With dry hands, connect the pump to power. Keep the plug and socket dry, and arrange a drip loop so water travelling down the power cord does not run directly towards the socket.
- Observe the filter, then adjust airflow using the approved control method. Look for bubbles rising through the intended lift tube and water moving from the outlet. Check each airline joint for disconnection and listen for changes that indicate a restricted air path.
Expected result: bubbles rise through the intended channel, water leaves the filter outlet, and the tubing stays attached without pulling the filter out of position.
Judge the setup by water movement and fish behaviour, not bubble size alone. Strong bubbling can create excessive turbulence, while weak bubbling can indicate a restriction or insufficient airflow for the filter’s depth and design.
For a sponge filter, look for water being carried up and out of the lift tube. If bubbles escape beside the sponge instead, revisit the internal connection and assembly. Do not keep increasing pump output to compensate for a disconnected fitting.
Watch the aquarium’s inhabitants after the change. If fish struggle against the current or cannot use their usual resting areas, adjust the approved airflow control or filter position. Retain the water movement needed for the filter to operate.
Variant: connect an air-driven undergravel filter
An undergravel filter uses a different intake arrangement, but the pump-to-filter air path follows the same principle. Rising bubbles in an uplift tube draw water through the substrate and down towards the filter plate.
- Confirm that the undergravel system is configured for air-driven operation. A system using a powerhead has a different connection method.
- Assemble the uplift tube and any air stone or air fitting exactly as the filter instructions show. Connect the airline to that fitting, not to an unrelated opening in the filter plate.
- Route the airline through a correctly oriented check valve to the pump, then start the pump and check for water leaving the uplift outlet.
Expected result: air rises inside the uplift tube and carries water towards its outlet, rather than escaping under the plate or beside a loose connection.
Do not treat an undergravel conversion as a quick accessory swap in an established aquarium. Moving the plate or disturbing the substrate changes the filter arrangement and can release trapped debris. Plan that work separately from connecting the airline.
Troubleshooting
No bubbles reach the filter
Check whether the pump is running, then inspect the tubing for pinches and the check valve for reversed orientation. A disconnected outlet or blocked fitting can also stop airflow. Switch off the pump before disconnecting components, and keep water away from the pump and electrical connections.
Bubbles appear, but little water leaves the lift tube
Check the filter’s assembly and air-inlet connection. Bubbles escaping outside the intended airlift do not drive it correctly. Inspect the sponge or intake for blockage and confirm that the lift tube is seated as directed.
The filter floats or shifts position
Remove trapped air from a sponge according to its instructions and check that the base or mounting arrangement is correctly assembled. Reroute tight tubing that pulls the filter sideways. Do not add improvised weights that introduce unsuitable materials into the aquarium.
The pump rattles or becomes unusually noisy
Check whether the pump casing or airline touches the aquarium cabinet, lid or another hard surface. Reposition the pump on a stable surface without covering ventilation openings. If the sound changes sharply or output drops, follow the manufacturer’s fault-checking instructions rather than opening powered equipment.
Water enters the airline towards the pump
Disconnect power safely without handling wet plugs or sockets, and inspect the backflow protection. Check valve direction, condition and installation. Do not restart a wet pump; follow the manufacturer’s safety instructions, and have affected electrical equipment assessed before reuse.
Customise your workflow
Make the filter easy to service before adding more equipment. Leave access to the check valve, airline joints and filter body, and keep the pump where you can inspect it without reaching over open water.
For a multi-outlet pump or split airline, check the pump’s instructions before connecting additional filters. Air does not necessarily divide evenly between branches: depth, tubing route and restrictions affect each branch’s airflow. Verify water movement at every filter instead of judging the shared pump by its sound.
A new sponge filter is not an instantly mature biological filter. If you are replacing established filtration, protect the existing biological media and monitor aquarium water quality during the change. Starting the air pump confirms mechanical operation, not biological readiness.
When shopping through Aqua Life Pet & Aquarium, match the filter, pump and airline accessories by their documented connections. Check the exact product’s specifications and delivery terms before ordering; category membership alone does not establish compatibility.
FAQ
Can I connect an air pump to any aquarium filter?
No. Connect an air pump only to a filter designed for air-driven operation or a connection expressly permitted by its manufacturer. Electrically powered filters usually move water with their own motor.
How do I connect an air pump to a sponge filter?
Run compatible airline tubing from the pump through a correctly oriented check valve to the sponge filter’s designated air inlet. Assemble the filter as instructed, submerge it and confirm that bubbles carry water through the lift tube.
Which way should the aquarium check valve point?
The check valve must permit airflow from the pump towards the aquarium. Use its direction marking or instructions; do not guess from its shape or colour.
Does a sponge filter need an air stone?
A sponge filter needs an air stone only when its design calls for one. Follow the filter’s assembly instructions rather than adding an air stone to every setup.
Can I attach an air pump to my filter’s venturi inlet?
Only attach an air pump to a venturi inlet if the filter manufacturer explicitly permits it. A venturi normally draws air using moving water, so its air connection is not automatically an external-pump connection.
Why is my sponge filter bubbling but not moving water?
Bubbles without the intended water movement indicate that you need to check the airlift connection, filter assembly and intake. Escaping air, a blocked sponge or an incorrectly seated lift tube can prevent proper operation.
What should I check before ordering airline accessories from Aqua Life Pet & Aquarium?
Check the tubing dimensions, connector fit, valve direction instructions and your filter’s required assembly. Review the exact product information and delivery terms before ordering rather than assuming aquarium accessories are interchangeable.
One last thing
A working airlift and a mature biological filter are different things. After connecting the pump, check water movement first, then continue your normal water-quality checks. Clear water and visible bubbles do not establish that the aquarium’s biological filtration is ready.